It is almost the 4th of July, so right now (as I type this blog! :P) I am painting my nails to have a fun, festive red, white and blue design on them. I have a pretty good idea of what I want to do, so I'll post step by step pictures as I go. Please keep in mind though, I'm not a professional...yet!
First, you'll want to file and shape your nails. If your nails or longer you can either do a rounded nail or one that is squared (Like the French Manicures typically are) if you have shorter nails I would recommend rounding it, just because it tends to look better.
Next, make sure you apply that BASE coat. I never really understood why you needed a base coat until a few months ago when I started doing my nails more often, but trust me, IT'S IMPORTANT! You'll especially want to use the base coat if you are using a darker color on your nails, such as, black, blue, or even red. Your nails will be less likely to stain that ugly yellow color if you apply the base coat to protect your nails. I used Finger Paints Base Coat which I picked up at my local Sally's Beauty Supply Store. You can see in the picture that my nails have a bit of a shine to them from the base coat. :)

Next you'll want to apply your color. Since I'll be doing a bit of an intricate design using red, white and blue, I'll be starting with 2 coats of my white color. I am using SinfulColors Professional Snow Me White which I got from Walmart. Don't worry if you get a little outside of your nails on the skin, it will come right off with soap and water after your nails are completely dry.
I like to do both hands as I go, after each step, so if you want, go ahead and do your other hand with the 2 coats of white. After the white I am going to apply red stripes! I'm using Nicole by OPI OMB! It's a very shimmery red color. I'm not sure where I got it though... :-/.
Okay, how I did the stripes was I made sure most of the nail polish was off of the brush making sure there aren't any globs at the top of the brush that will run down. Then using the side of the brush starting at the base of the nail make the red lines so they go up from the bottom of your nails. Go far enough up that when you use the blue polish it will overlap slightly. If you have a red striper brush I would use that for this. I don't so I'll be using the side of my regular nail polish brush.

Now onto the blue! I am using Finger Paints Cerulean Seascape which was purchased from Sally's Beauty Supply as well. As you are applying the blue try to get it as straight as you can and be sure to cover the red stripes slightly. I applied 2 coats for a deeper looking blue. Okay so just a small reminder/tip: Make sure you set out everything you are going to use BEFORE you start painting your nails! I am reminding you because I just messed up one of my nails trying to grab my dotting tool. Opps! :D All fixed now though!

So now that you are done with the main part of the design go back and sharpen up your red stripes with a white striper brush. I am using It's So Easy Stripe Rite White which I bought from Sally's Beauty Supply.
You can leave your nails like this if you wish or you can add some rhinestones which can be purchased online. I bought mine from amazon.com-5 Nail Rhinestones Wheels with Total of 7400 Nailart Rhinestones. This set contained clear stars which is perfect for this design. Start by applying small dots of a top coat on the areas of your nail that you want the stars to go. Make sure you don't have a huge amount on your brush otherwise the rhinestones are going to slip all over the place. You will also want to have a small amount off to the side so you can dip your dotting tool (or a toothpick works just as well). I just use a disposeable plastic plate for this.
I want you to know that this step is pretty time consuming! Especially if you put on a lot of rhinestones like I did and you're a bit of a perfectionist to which I am guily as charged! :P It's so worth it though because the end result looks amazing!
When you apply the rhinestones, place a small amount of your top coat on your nail where you want the rhinestone to be. Dip your dotting tool into the small amount of top coat you have off to the side, then poke the rhinestone with the wet end which will make it stick. Place on the wet dot on your nails and slide it (but not too much!) to where you want it to go. Then move on to your next rhinestone placement using the same steps. After you are done and are satisfied with your rhinestones, put on a good top coat immediately! Otherwise those rhinestones you worked so hard to apply will fall off. The top coat I use is European Secrets Hoofer's Choice Hoof Sheild Top Coat, which was purchased at Sally's Beauty Supply. So after you are all done with your nails they should look something like this...

Very patriotic right? ;) I hope you like the way your nails turned out! If you have any questions, please don't hesitate to ask, and thanks for following along with me for my very first how to, for nail designs! Keep checking back, to see what other easy nail designs you can do! Enjoy your 4th of July with your pretty nails!
Much love,
K
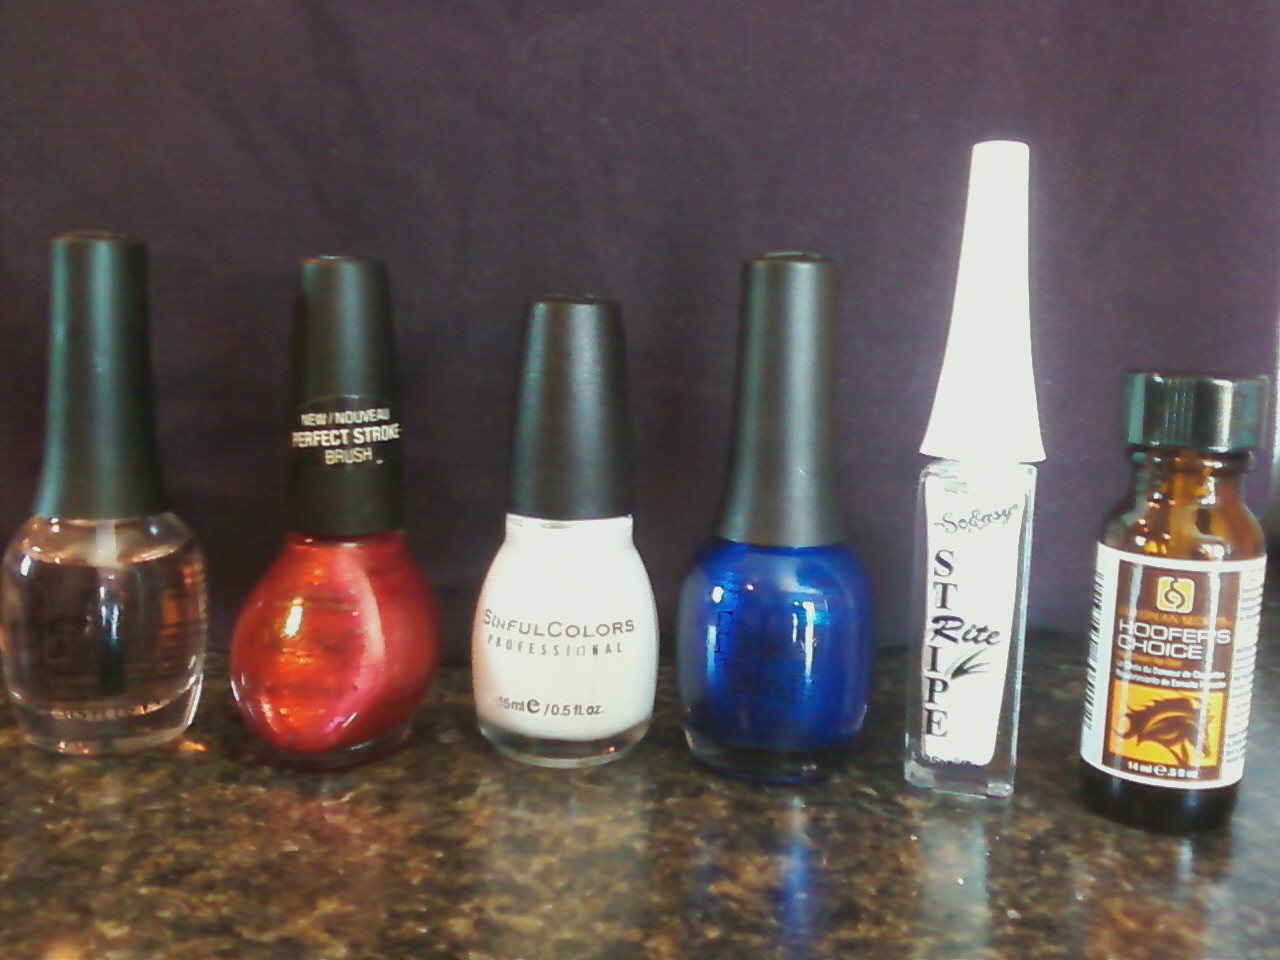 |
| Here is all the nail polish I used for this 4th of July design! |